|
|
|
|
|
|
|
|
|
|
|
|
|
|
|
|
|
|
|
|
|
|
|
|
|
|
|
|
|
1.
|
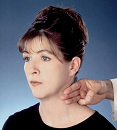
Measure the vertical distance from the top of the patient’s shoulder to the tip of the chin (Figure 1. “A”). |
|
|
|
|
|
|
|
|
|
|
| 2. |
The measurement corresponds to the HEIGHT of the Collar. If the patient’s measurement falls between two consecutive sizes, apply the smaller size first. |
|
|
|
|
|
|
|
|
|
|
|
|
|
|
|
|
|
|
|
|
|
|
|
|
|
|
|
|
|
|
|
|
|
|
|
|
| 3. |
Measure around the patient’s neck (Figure 2. “B”). |
|
|
|
|
|
 |
| 4. |
The measurement corresponds to the size CIRCUMFERENCE of the Collar. If the patient’s measurement falls between two consecutive sizes, apply the larger size first. |
|
|
|
|
|
| |
|
|
|
|
|
|
|
|
|
|
|
|
 |
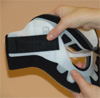
Use your fingers to measure the distance from the top of the patient’s shoulder to the tip of the chin.
Position your fingers against the FRONT side of the Collar from the plastic bottom edge
to the top of the Velcro hook fastener.
Select the size closest to the height of your fingers. |
| |
|
|
|
|
|
|
|
|
|
|
|
|
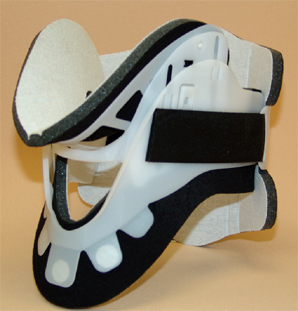
Proper application of the Collar is as important as proper sizing for immobilization and patient comfort.
The two-piece design consists of a FRONT piece and BACK piece which are packaged as a set.
Always maintain the patient's head in neutral alignment. These directions are guidelines only; follow a qualified healthcare provider's instructions.
|
| Size Collar:
|
|
|
| |
Correspond the size of the patient in neutral position with the Collar.
|
|
|
| Lock Size: |
|
|
|
|
| |
Position the Collar with the selected size. Press the lock into the Collar until secured. Verify by attempting to readjust. If movement occurs, repeat procedure until the Collar is secure. |
|
 |
|
|
|
Adjust Size: |
|
|
|
|
| |
To unlock, simply push the lock to return to its unsecured position. Determine the proper height for the patient and press the clip into the selected size. If movement occurs, repeat procedure until the Collar is secure
|
|
 |
|
|
|
1. |
After selecting the properly sized Collar, apply the FRONT piece of the Collar to the front of the patient's neck. Center the Collar. The front arrow should point upward. |
|
 |
|
|
|
2. |
Center the Collar BACK piece on to the patient's neck. With the FRONT piece properly secured, use the bilateral Velcro straps to fasten the FRONT and BACK pieces together. |
|
 |
|
|
|
3. |
Improvement of immobilization and comfort is achieved by minor adjustments of the straps and BACK piece supports. |
|
 |
|
|
|
Before removing the Collar, mark the position of the Velcro strap location to ensure re-application maintains the proper fit.
With the Collar secured on the patient, unfasten the Velcro strap. Remove the Collar from the patient.
|
| |
|
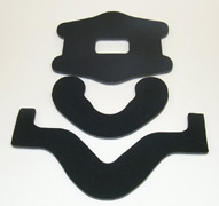 The Collar has removable laminated pads that wick away moisture to ensure the patient is clean and comfortable while preventing skin irritation. Each set contains three pads; back pad, sternum pad and chin pad.
To properly clean the Collar, it is recommended that the patient has an additional removable pad set as a replacement while the original pad set is air-drying.
Always attach the removable pads in the proper orientation with the pads positoned to contact the patient's skin. Pad adjustment may be necessary to ensure that no plastic contacts the skin.
|
|
Proper hygiene and product cleaning are an important part of a patient's recovery. In addition, it will keep the patient clean, comfortable and prevent skin irritation. A qualified healthcare professional will establish your cleaning routine.
After the Collar is removed, gently clean the patient's neck and face; if there is skin irritation contact a qualified healthcare professional. The patient's neck and face should be dried completely before the Collar is applied.
Separate the Collar's removable pads from the Collar's plastic parts before cleaning.
The Collar's plastic parts can be cleaned with mild soap and clean water. The Collar's plastic parts should be dried completely with a cloth or air-dried before it is applied to the patient. While a mild disinfectant is acceptable, do not use harsh chemicals or bleach.
The Collar's removable pads can be cleaned with mild soap and clean water. The Collar's removable pads should be completely air-dried before they are reattached to the Collar's plastic parts. While a mild disinfectant is acceptable, do not use harsh chemicals or bleach. While the replacement pads are drying, attach an additional pad set to the Collar and apply to patient. If you do not have an additional pad set, please contact a qualified healthcare professional or contact us.
Apply the Collar as instructed by a qualified healthcare professional. |
|
|
|
|
|
|
|
|
|
|
|
|
|
|
|
|
|
|
|
|
|
|
|
|
|
|
|
|
|
|
|
|
|
|
|
|
|
|
|
|
|
|
|
|
|
|
|
|
|
|
|
|
|
|