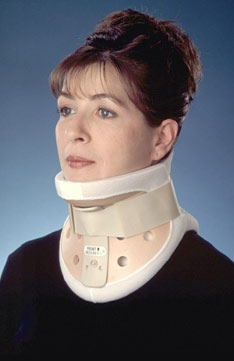
In 1994, the Philadelphia® Liner™ was introduced and was
designed specifically for the Philadelphia Collar to enhance the patient's
level of comfort during periods of extended wear.
The Philadelphia Liner is manufactured for both the Original and
Tracheotomy Philadelphia Collar.
Every product we manufacture demonstrates our commitment to patient
compliance and recovery through superior immobilization and comfort.
|
 |
 |
|
|
|
|
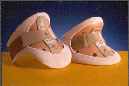
- Manufactured for optimal absorption and comfort.
- Removable, washable and reusable.
- Sanitary and soft.
- Clean with mild soap and clean water.
- Form-fit to all Original and Tracheotomy Philadelphia Collars.
- Also available with trachea opening.
- X-ray, CT and MRI lucent.
|
|
|
|
|
|
|
|
|
|
|
|
|
|
|
|
|
|
|
| Sizes: Adult,
Child (3 to 13 years old) and Infant (1 to 3 years old) |
|
|
|
|
|
|
|
|
|
|
| For more information,
please refer to |
|
Sizes: |
|
Product
Table |
|
|
|
|
|
|
|
|
|
|
|
| Philadelphia
Liner sizes are identical to Philadelphia Collar sizes. The Liner
form fits both the Original and Tracheotomy designs. |
|
 |
|
|
|
|
|
|
| |
|
|
|
|
|
|
|
|
|
|
|
For proper
fit, the Liner label and central seam should be parallel to the plastic
reinforcement. This application is identical for both the FRONT and
BACK pieces.
Each Liner is individually designed to fit securely on the Philadelphia
Collar. After matching the Liner size to the corresponding Collar
size, insert the Collar into the Liner as demonstrated below.
After the Liner FRONT and BACK pieces are secured on the Collar FRONT
and BACK pieces, apply the Collar to the patient. |
|
|
|
|
|
|
|
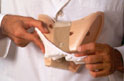
1.
|
Align the
top end of the Collar with the upper edge of the Liner seam. Insert
the Collar into the Liner. |
|
|
|
|
|
|
|
|
|
|
|
|
|
|
|
|
|
|
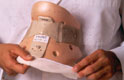
2.
|
Simply follow
around the edge of the Collar with the Liner seam. The seam should
finish at the opposite end of the Collar. |
|
|
|
|
|
|
|
|
|
|
|
|
|
|
|
|
|
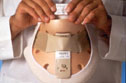
| 3. |
With both
hands, place the top portion of the Liner over the Collar. Complete
by tucking the label under the Liner. |
|
|
|
|
|
|
|
|
|
|
|
|
|
|
| 4. |
Once the
Liner is secured onto the Collar, follow the Collar application instructions,
as provided by a qualified healthcare professional. |
|
|
|
|
Before removing the Collar, mark the position of the Velcro strap
location to ensure re-application maintains the proper fit.
With the Collar secured on the patient, unfasten the Velcro strap
on the RIGHT side and then the LEFT side. Remove the Collar from the
patient. Remove Liner in a similar manner as it was applied.
|
|
Proper hygiene and product cleaning are an important part of a patient's
recovery. In addition, it will keep the patient clean, comfortable
and prevent skin irritation. A qualified healthcare professional will
establish your cleaning routine.
After the Collar is removed, gently clean the patient's neck and face;
if there is skin irritation contact a qualified healthcare professional.
The patient's neck and face should be dried completely before the
Collar is applied.
The entire Liner and Collar can be cleaned with mild soap and clean
water. The Liner and Collar should be dried completely with a cloth
or air-dried before they are applied to the patient. While a mild
disinfectant is acceptable, do not use harsh chemicals or bleach.
Apply the Liner and Collar as instructed by a qualified healthcare
professional. |
|